
Jeff Keller
December 30, 2019
Disabling Wi-Fi in the LG B9 65 inch 4K "Smart" OLED TV
Why Do This?
“Smart” TVs are a massive security vulnerability. They record and transmit usage patterns, demographic information, and audio from your living room using integrated microphones, ostensibly for advertising and software improvement purposes. If you’ve actually read the User Agreements in a modern smart TV, you know what I’m talking about.
Some TVs even send still images of the content you are viewing for the purposes of “content recognition”. This could include content that you aren’t even playing from a TV app, but from an external device like a PC or BluRay player! The LG TV described in this post does this according to its User Agreements.
Smart TVs are such a security threat, that the FBI recently put out a bulletin regarding the cyber crime risk associated with Smart TVs.
Now, you may feel that name brands like Sony, LG, and Samsung are trustworthy, and wouldn’t use this information for anything more nefarious than advertising. But these data can be lost, stolen, or intercepted by bad actors who could use it in harmful ways. If the massive data breaches and leaks of the 21st century has taught us anything, it isn’t a matter of if, but when.
There are other reasons as well. Maybe you don’t want another device taking up space in the ever-crowded 2.4 GHz frequency band, maybe you want to conserve energy, or maybe you just don’t want another source of electromagnetic radiation in your home.
What To Do About It?
For a long time (10+ years) I decided that I just wouldn’t purchase a smart TV. My old dumb TVs worked just fine. But eventually the high-tech siren song of HDR, 10-bit color, 4K resolution, and infinite OLED contrast was too enticing to ignore.
Commercial or “hospitality” displays exist (think hotel TVs or fast food menu screens), but they tend to not have these high-end visual features and are ridiculously expensive compared to consumer TVs, because they aren’t subsidized by all those data mining profits.
So eventually I gave in, and in November 2019 I purchased my first smart TV, an LG B9 65 inch 4K “Smart” OLED TV (OLED65B9PUA).
Some people say “just don’t connect it to the Internet”. Unfortunately this isn’t very effective when TV manufacturers can easily have the TV attempt to silently connect to open Wi-Fi networks. For people in apartment buildings, this is not a fringe concern. And if you’re in an area in which Comcast operates, you probably know just how prevalent all those public Xfinity Wi-Fi networks are. I wouldn’t be surprised if other ISPs do something similar.
I concluded that there was only one option… I had to cut the lines of communication!
TV Lobotomy
The idea of opening up my brand new, very expensive TV was intimidating at first. I’ve built dozens of PCs in my day, but I was worried that I wouldn’t recognize any of the electronic components and that they might all be soldered together in a big mess. But once I got in there and saw what makes up a modern TV, my concerns disappeared quickly. Turns out that internal TV components are very modular and somewhat standardized. In fact, there are only a few main components:
- Panel: array of pixels that display the image
- Main Board: where the CPU and the I/O connectors live (e.g., HDMI, Ethernet)
- Power Supply: where the AC power cable connects
- T-Conn Board: where video signals from the main board are translated into something the panel can display
- Speakers: those awful sounding things that you probably don’t use because you have a better audio setup
- Wi-Fi Module: a small network interface card that wirelessly transmits all the dirt the TV has collected on you and your family
There are other components of course (e.g., microphones, infrared receivers, etc.) but these are the main ones you see when you open up an LED or OLED TV. The Wi-Fi module is what I was interested in surgically removing.
While this post is specifically about the LG B9, most TVs are constructed similarly and have similar components. I opened up an old Samsung LED TV from 2011 or so, and it looked more or less the same. So this post may be useful for other TVs as well.
1. Prepping an operating table
All of the internal components are hidden behind a plastic shroud on the back on the TV, so the TV needed to be placed face-down. The last thing I wanted to do was scratch the screen, so I placed the TV on some big cushions and a soft blanket.
2. Removing the plastic shroud
This was honestly the hardest part of the whole operation. There are a few screws that needed to be removed, but the shroud is mostly kept in place by plastic tabs and clips that you can’t see from the outside. I used a flat head screwdriver to gently coax the first few tabs on the bottom of the shroud to pop off.
With a few of them released, I was able to get my fingers under the shroud and run them along the perimeter, popping tabs and clips as I went.
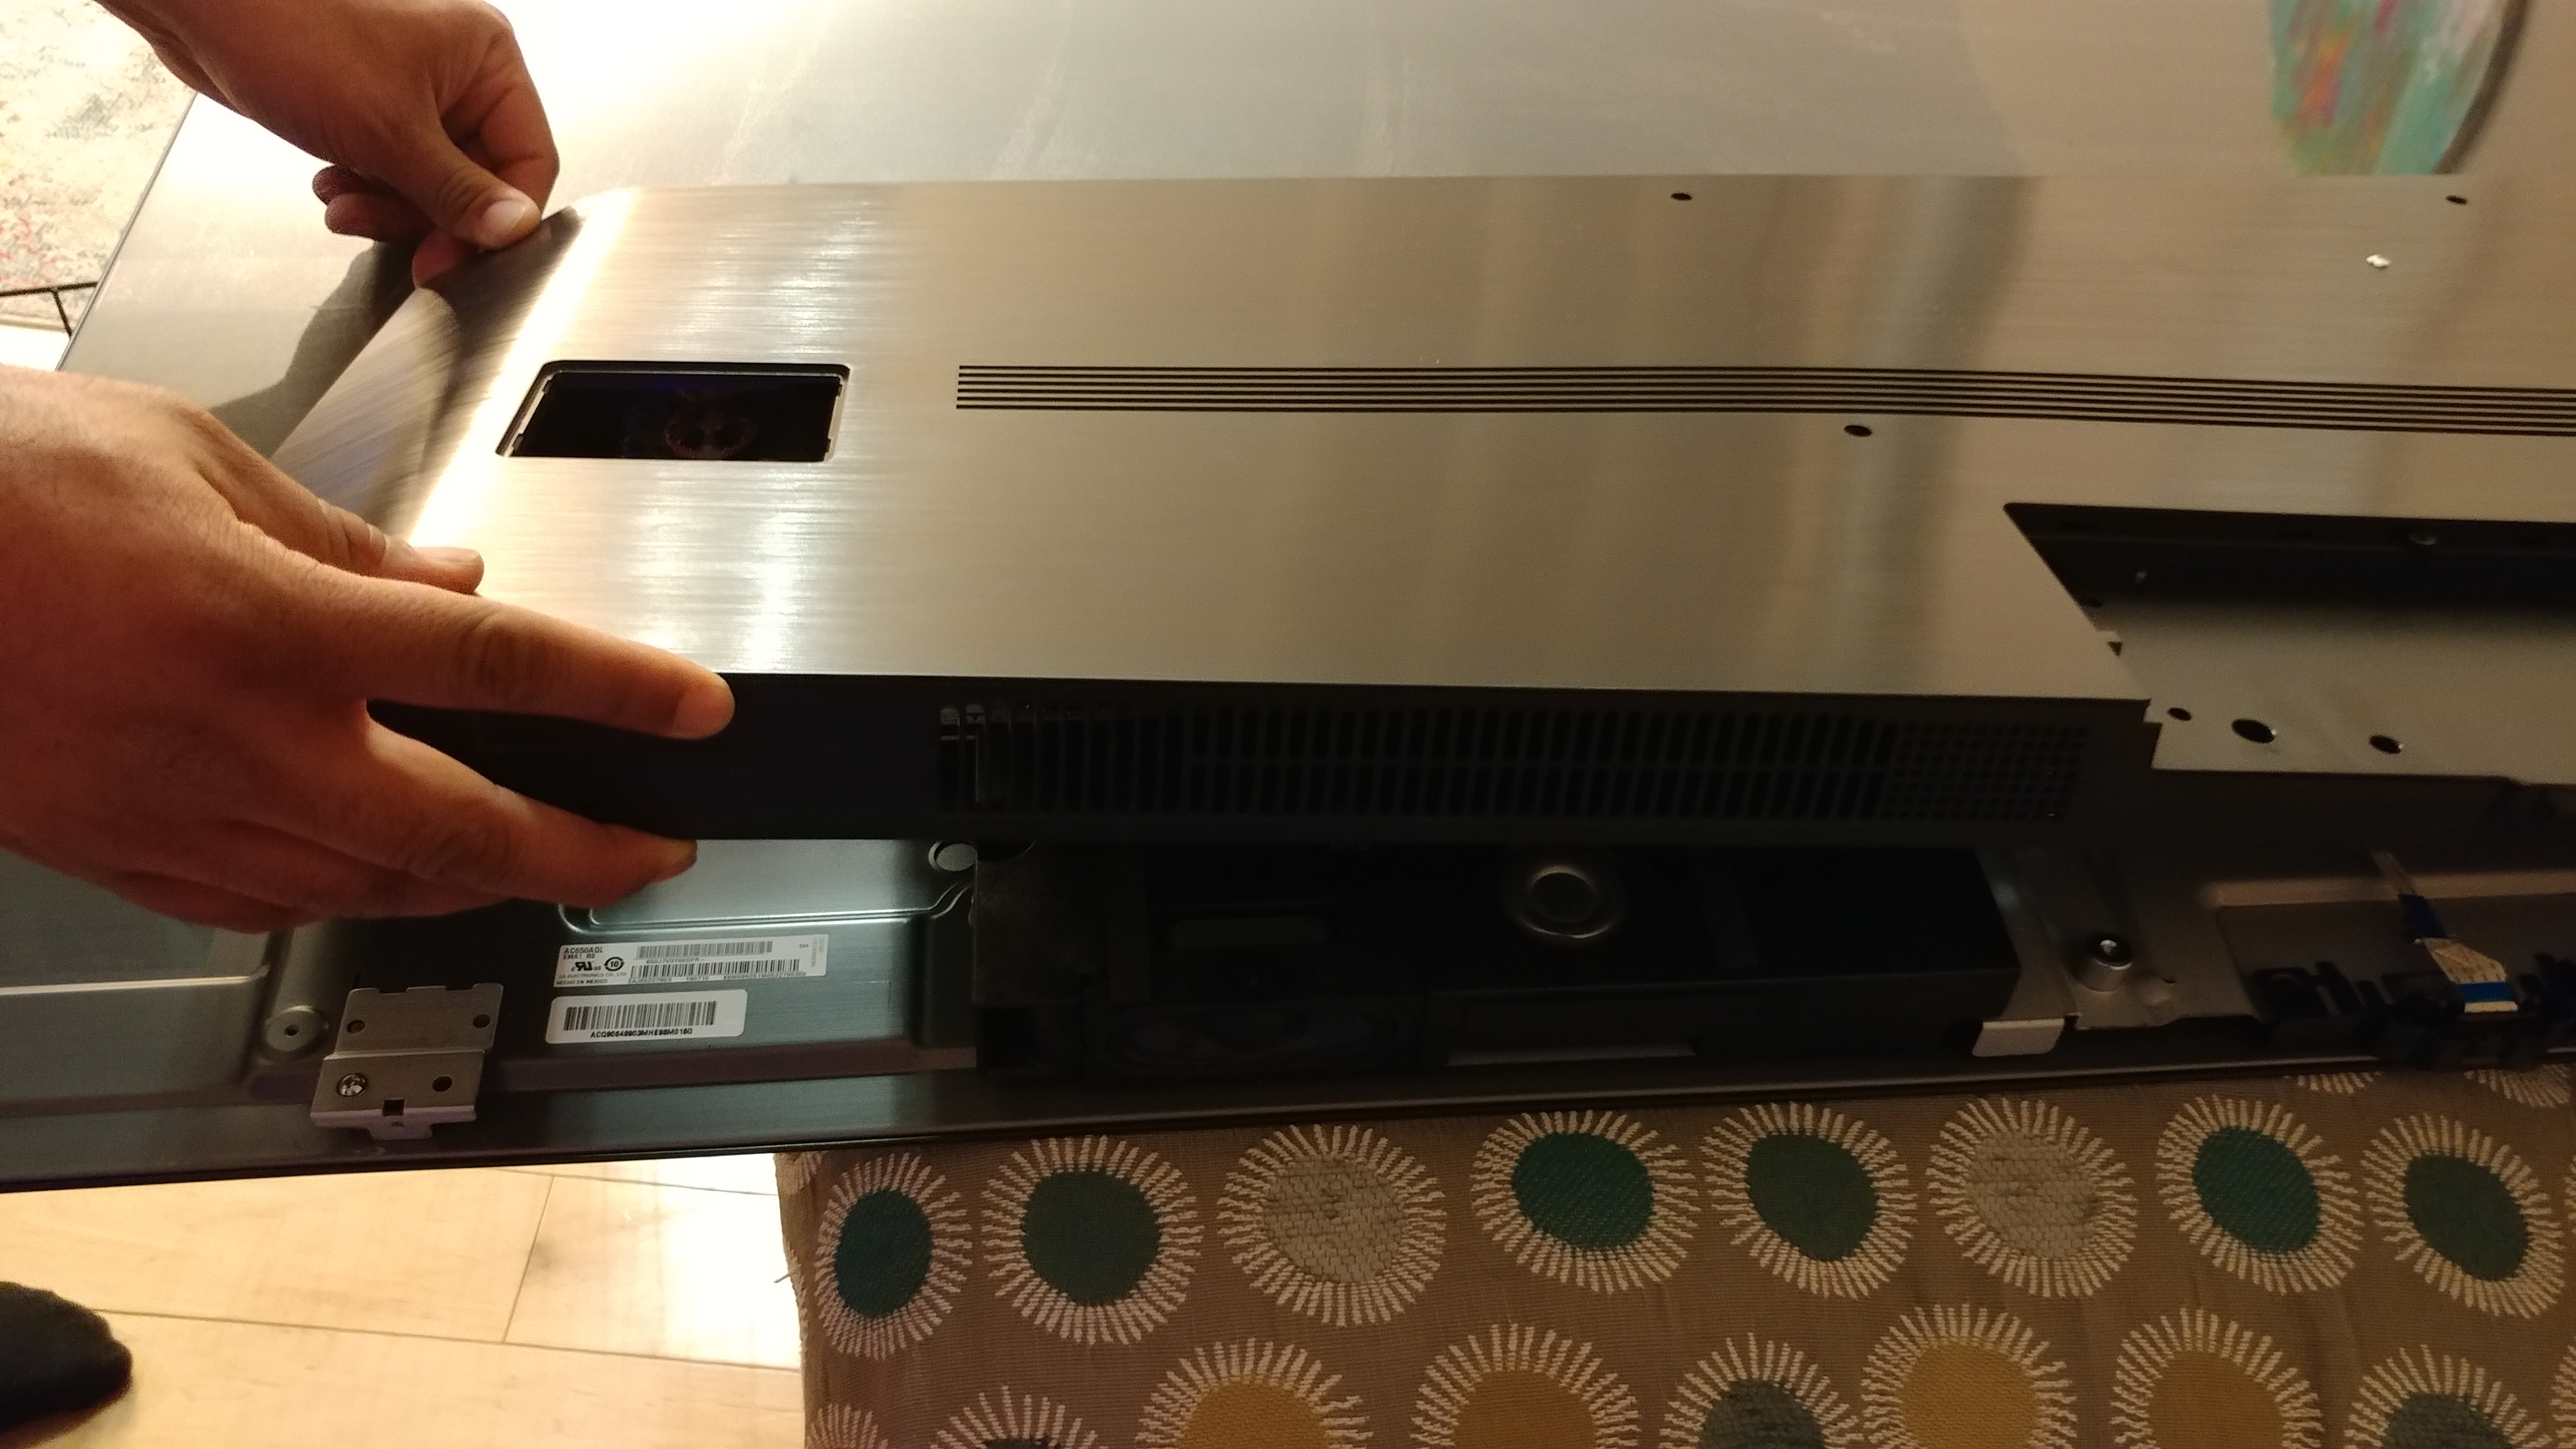
This particular TV has a semi-permanent power cord, so before I was able to completely remove the shroud, the power cord needed to be disconnected from the inside.
3. Disconnecting the power cord
With enough of the shroud’s clips and tabs released, I was able to get a hand underneath and into the area where the power cord connected to the power supply. It should go without saying that the TV should not be powered during the surgery.
Unplugging the white connector–the one with the black and white wires–allowed me to disconnect the power cord from the internal power supply board.
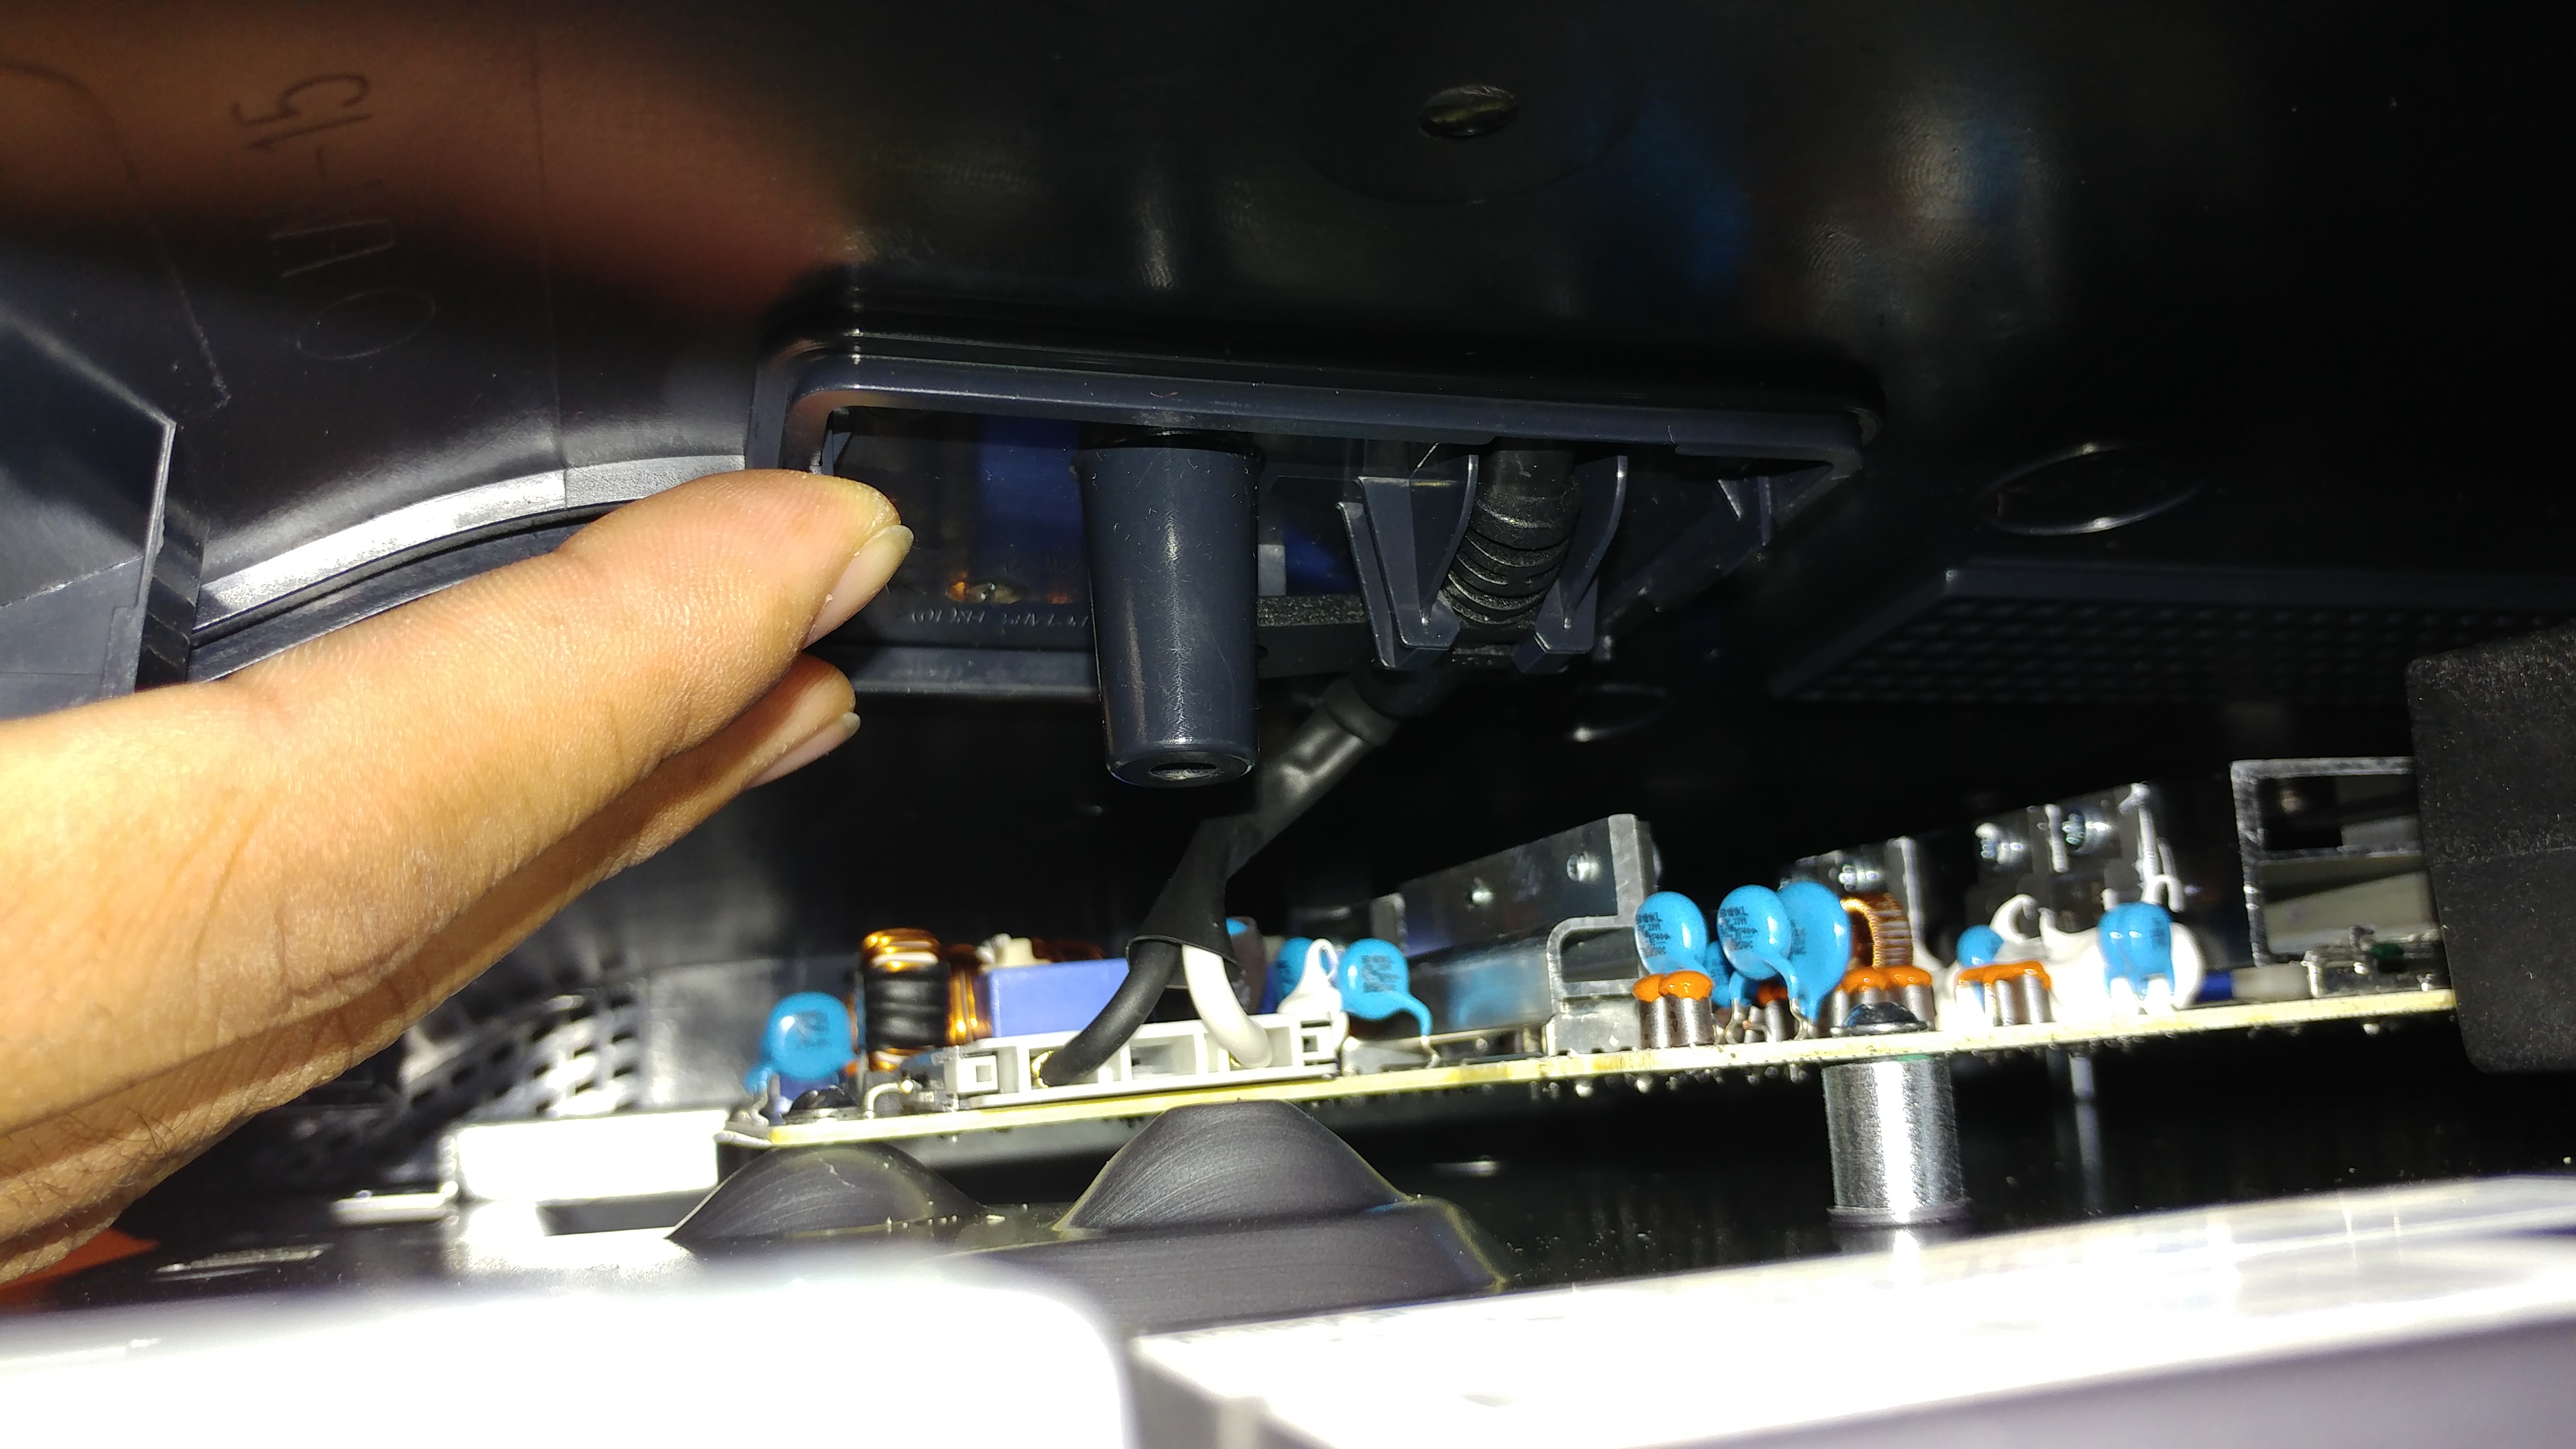
The power cord cover then popped off with some pressure applied from inside the shroud.
4. Unplugging the Wi-Fi module
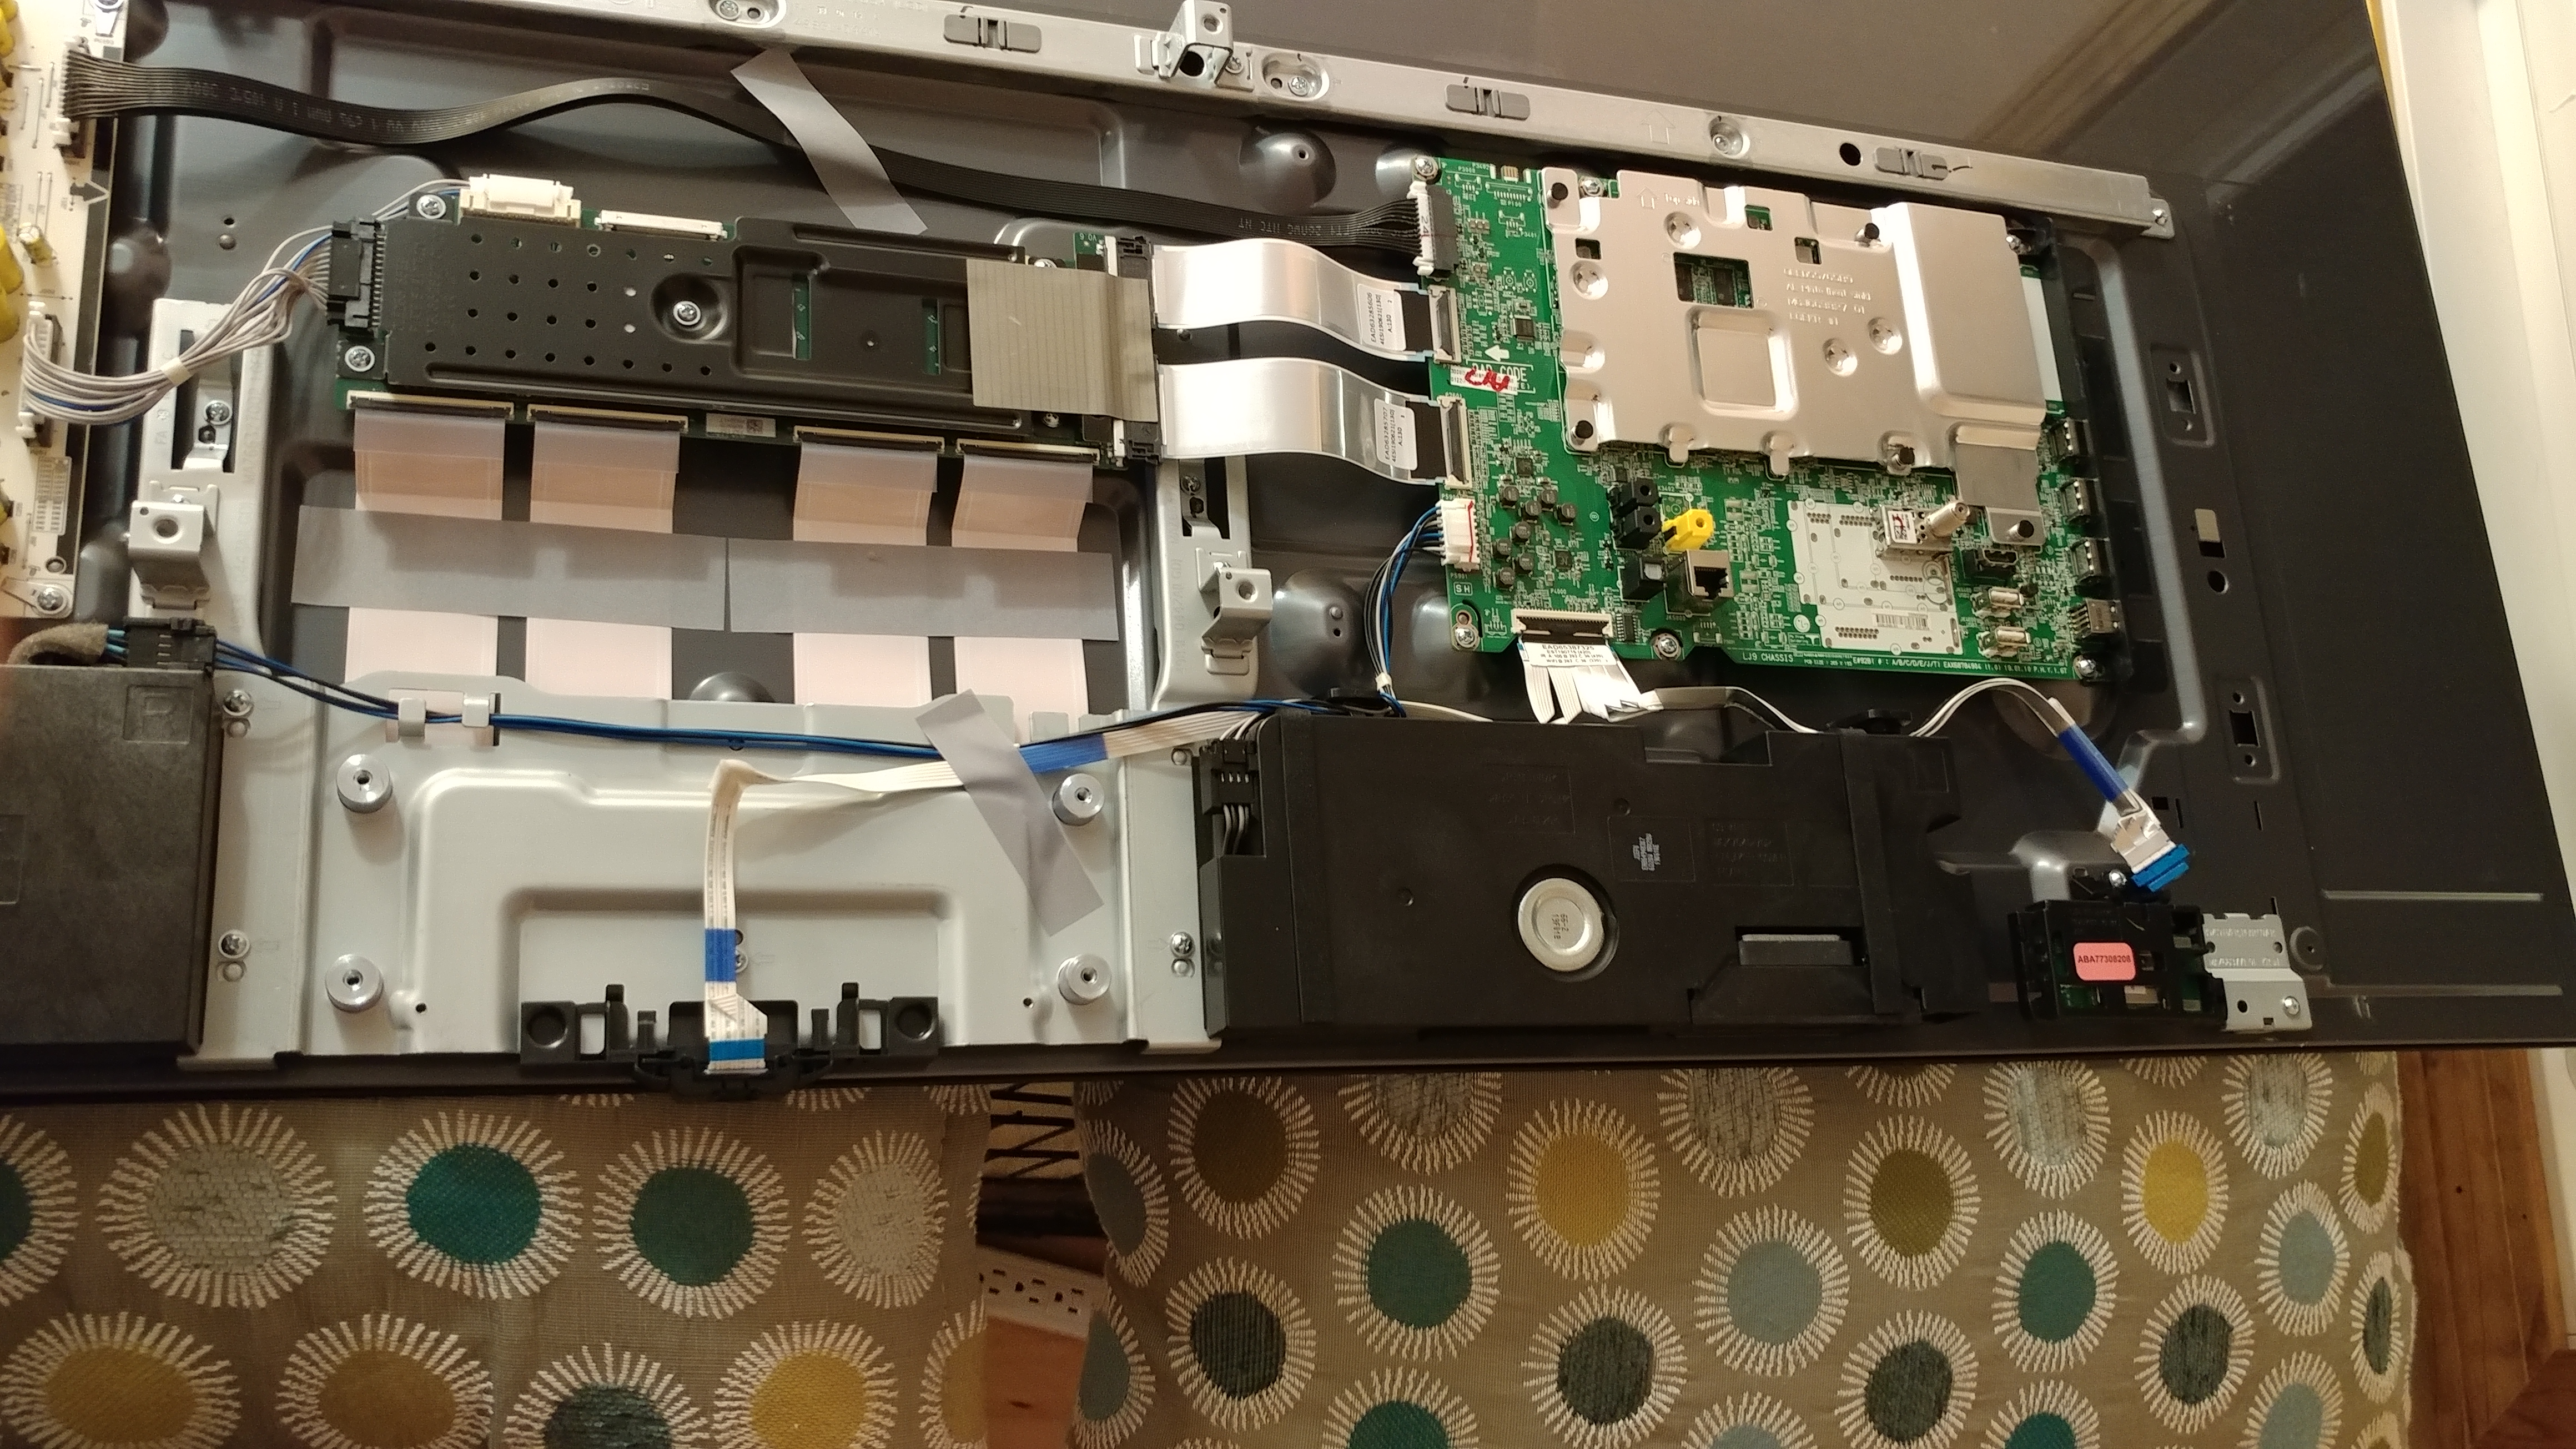
This is when I realized just how simple these TVs are! Here we can see the main internal components:
- Main Board: the green PCB in the upper right (interesting that there’s no fan here, just a heat spreader to cool the CPU)
- Power Supply: the white PCB in the upper left
- T-Conn Board: the piece in the center with all the ribbon cables
- Speakers: the black boxes at the bottom
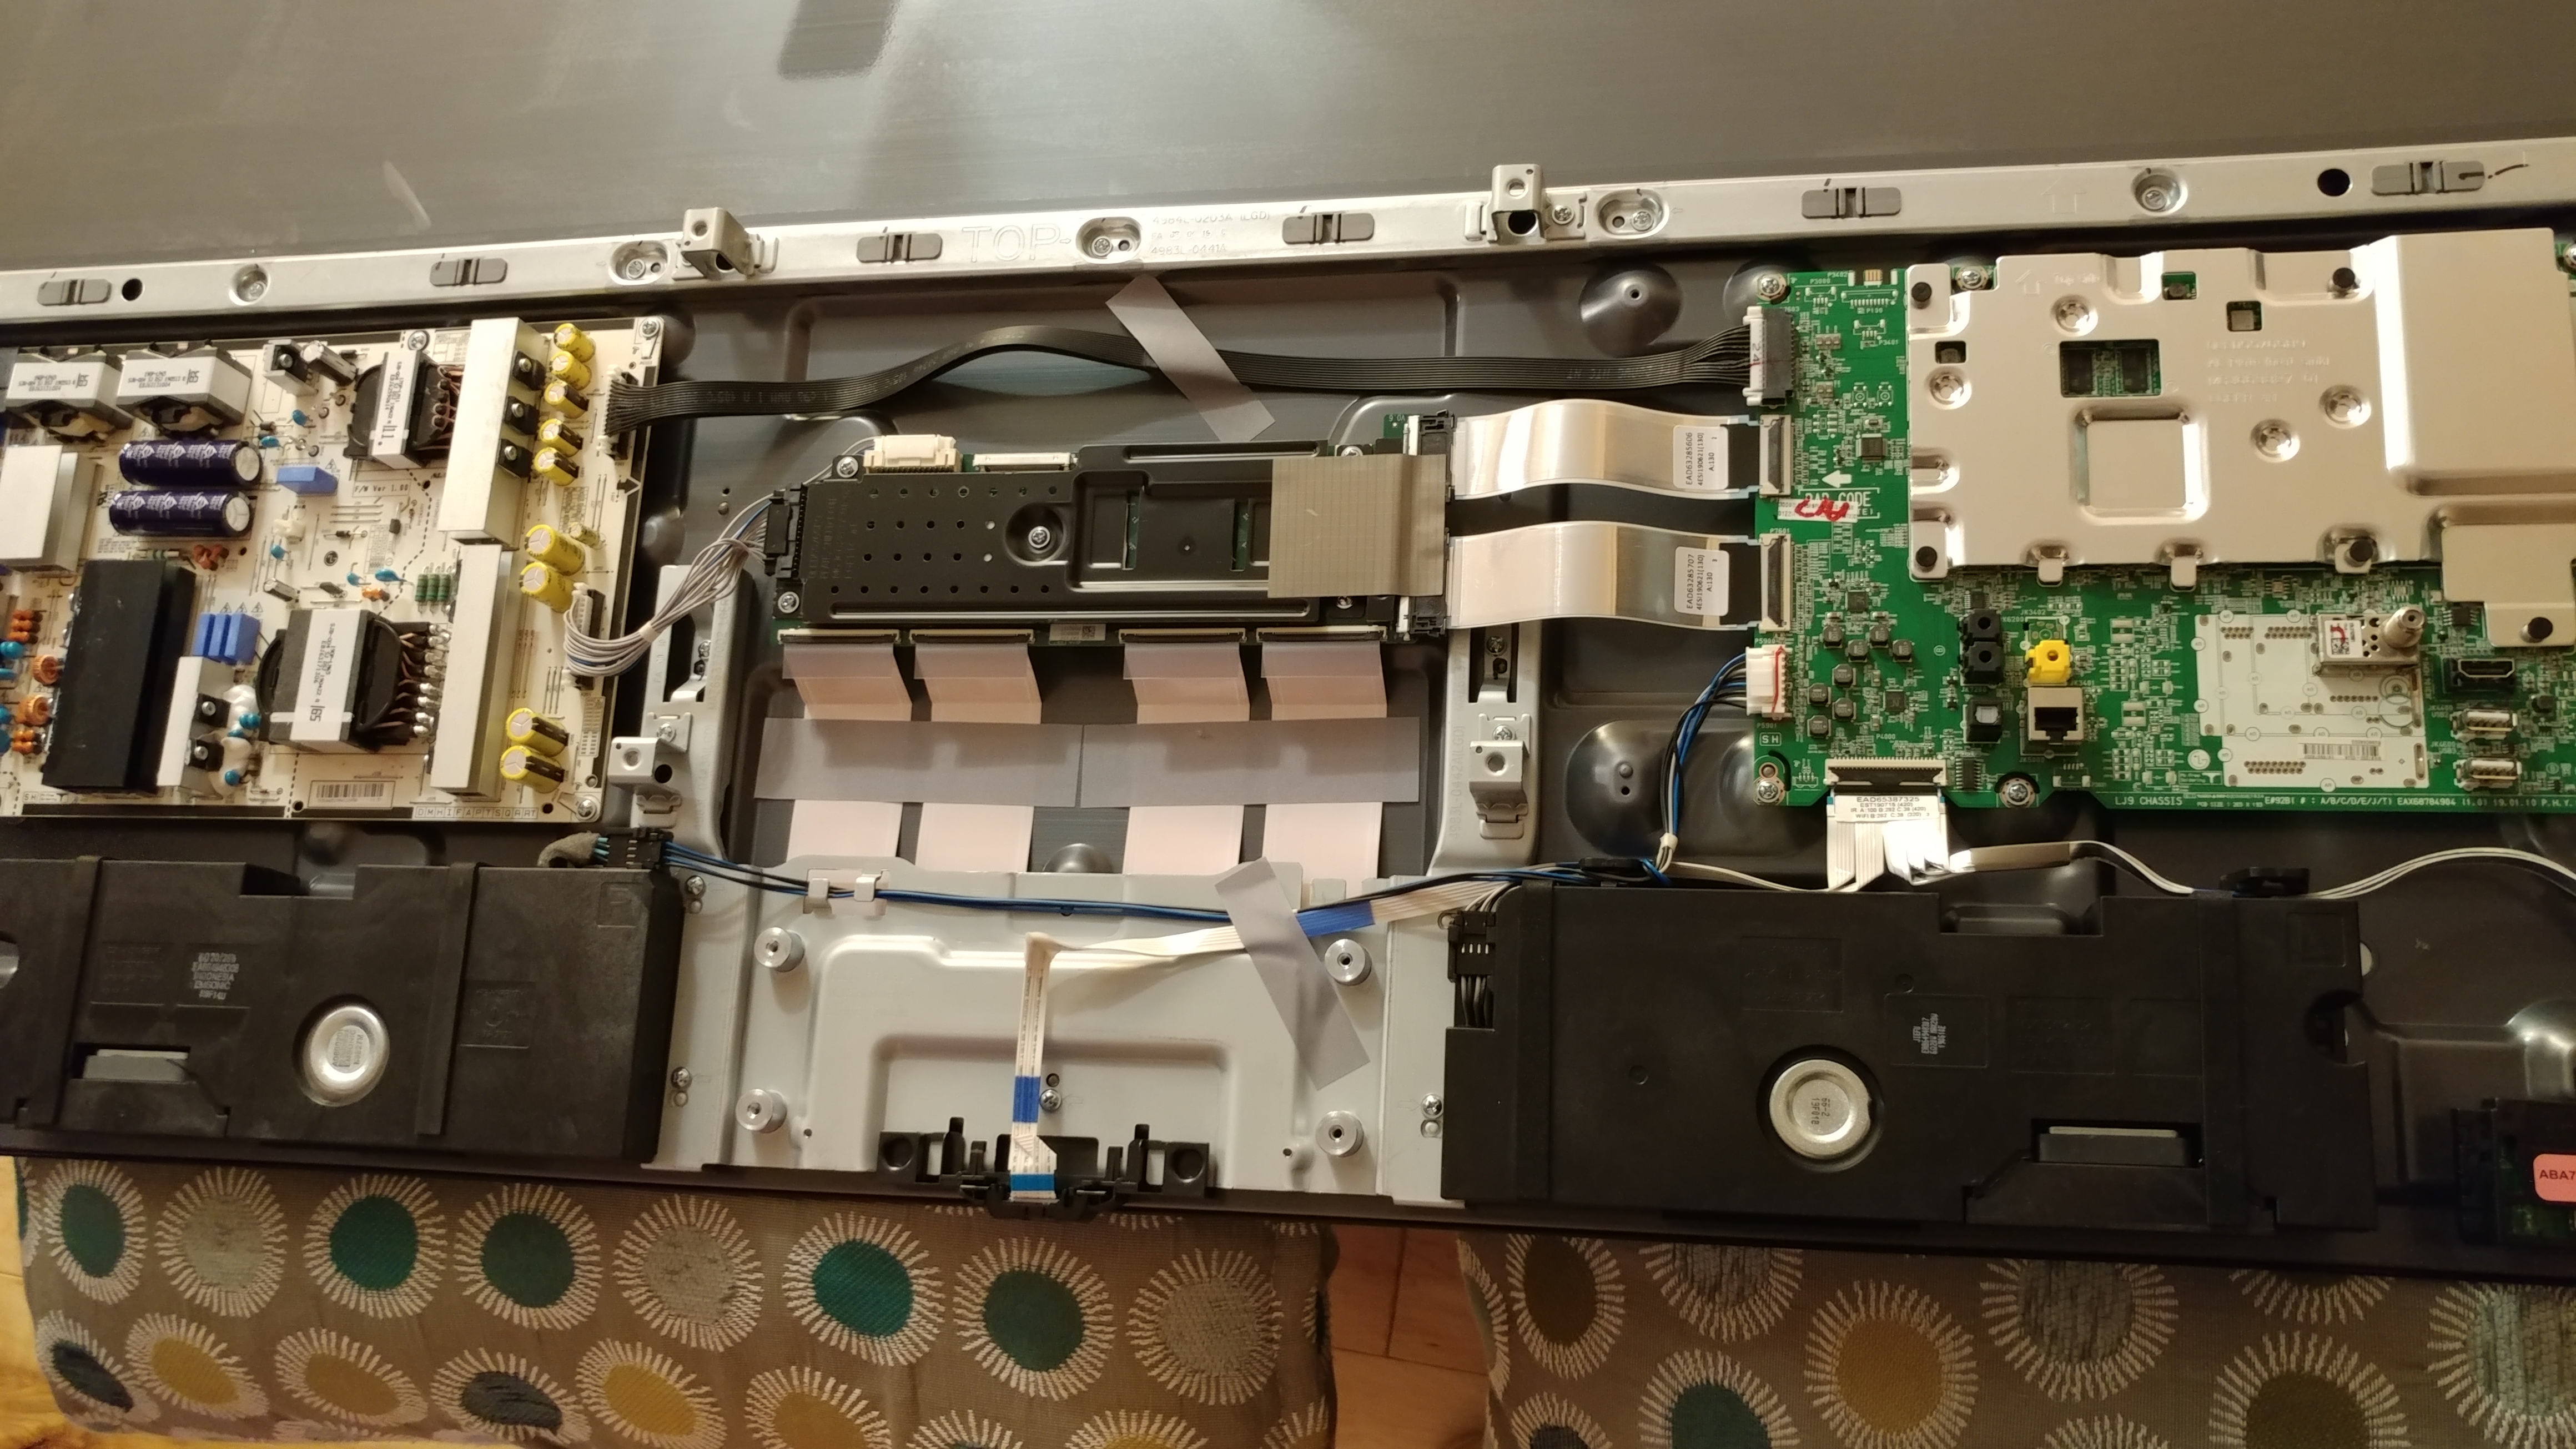
Then of course, the little Wi-Fi module at the far right below the Main Board, held in place by a plastic bracket.
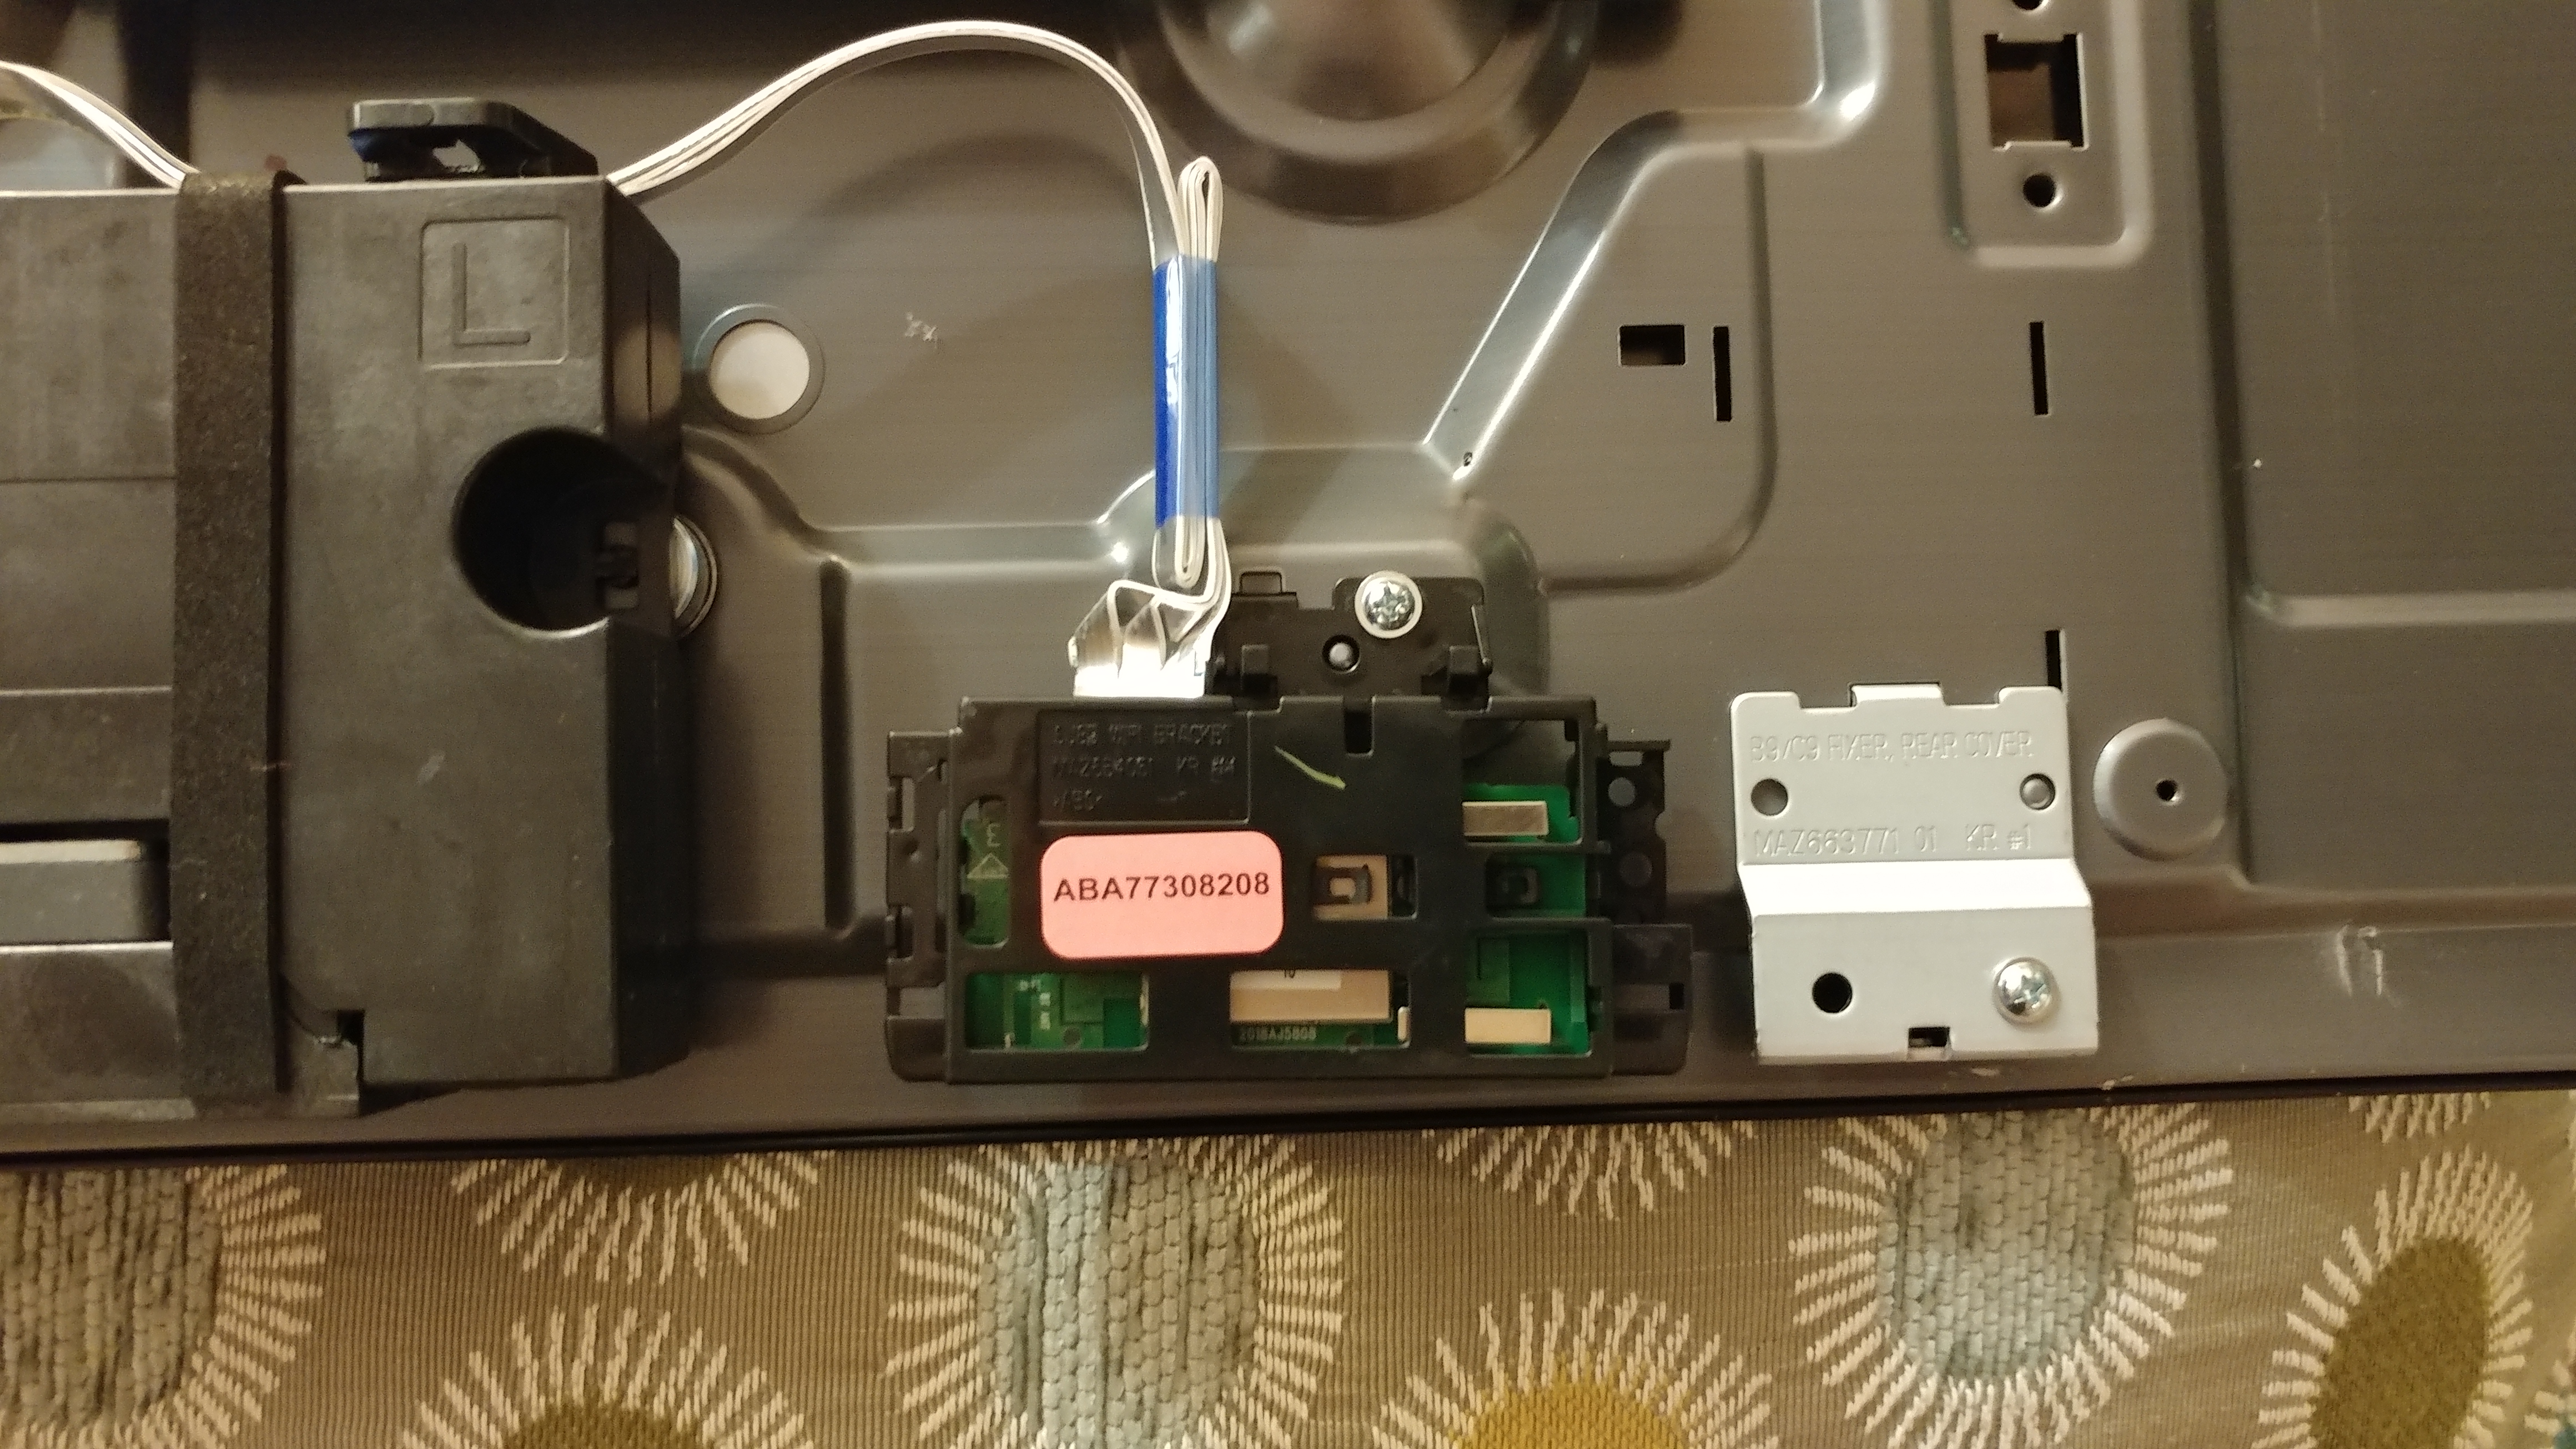
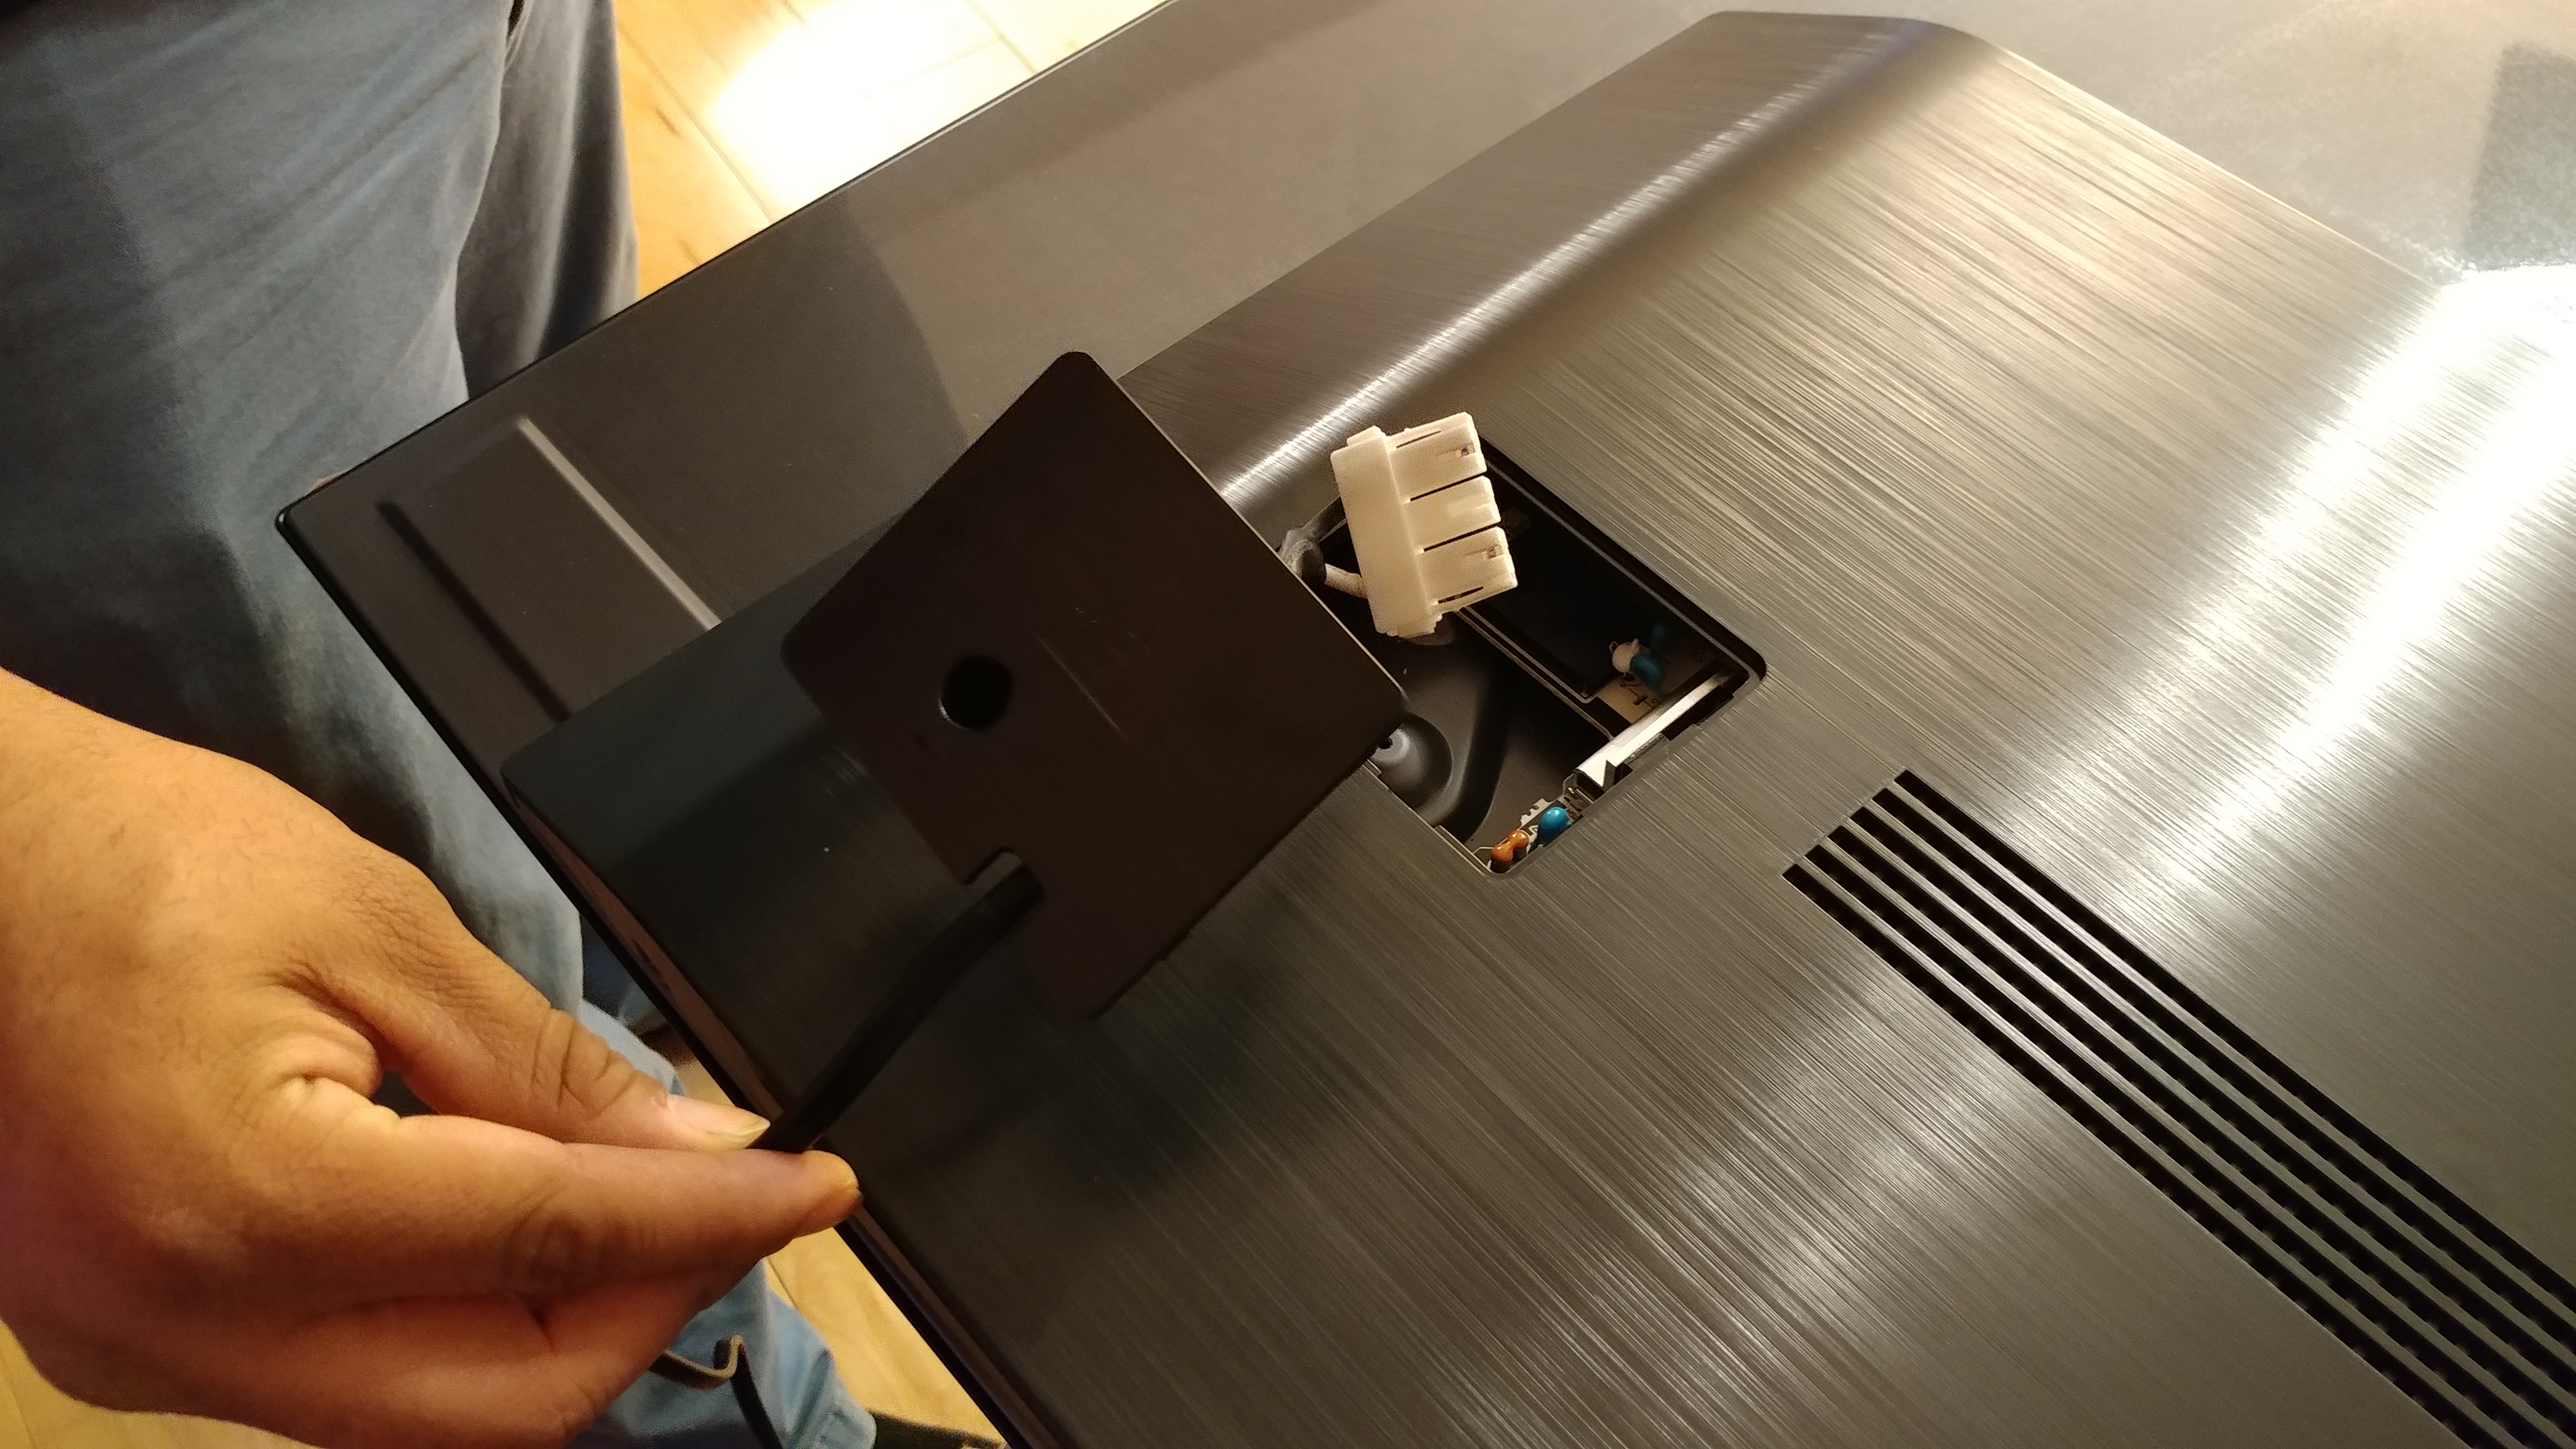
I unplugged the cable that connects the Wi-Fi module to the main board, and then realized that I don’t need to completely remove the Wi-Fi module, it can just be left disconnected. I figure this will make things easier on future-me if I ever decide to sell the TV.
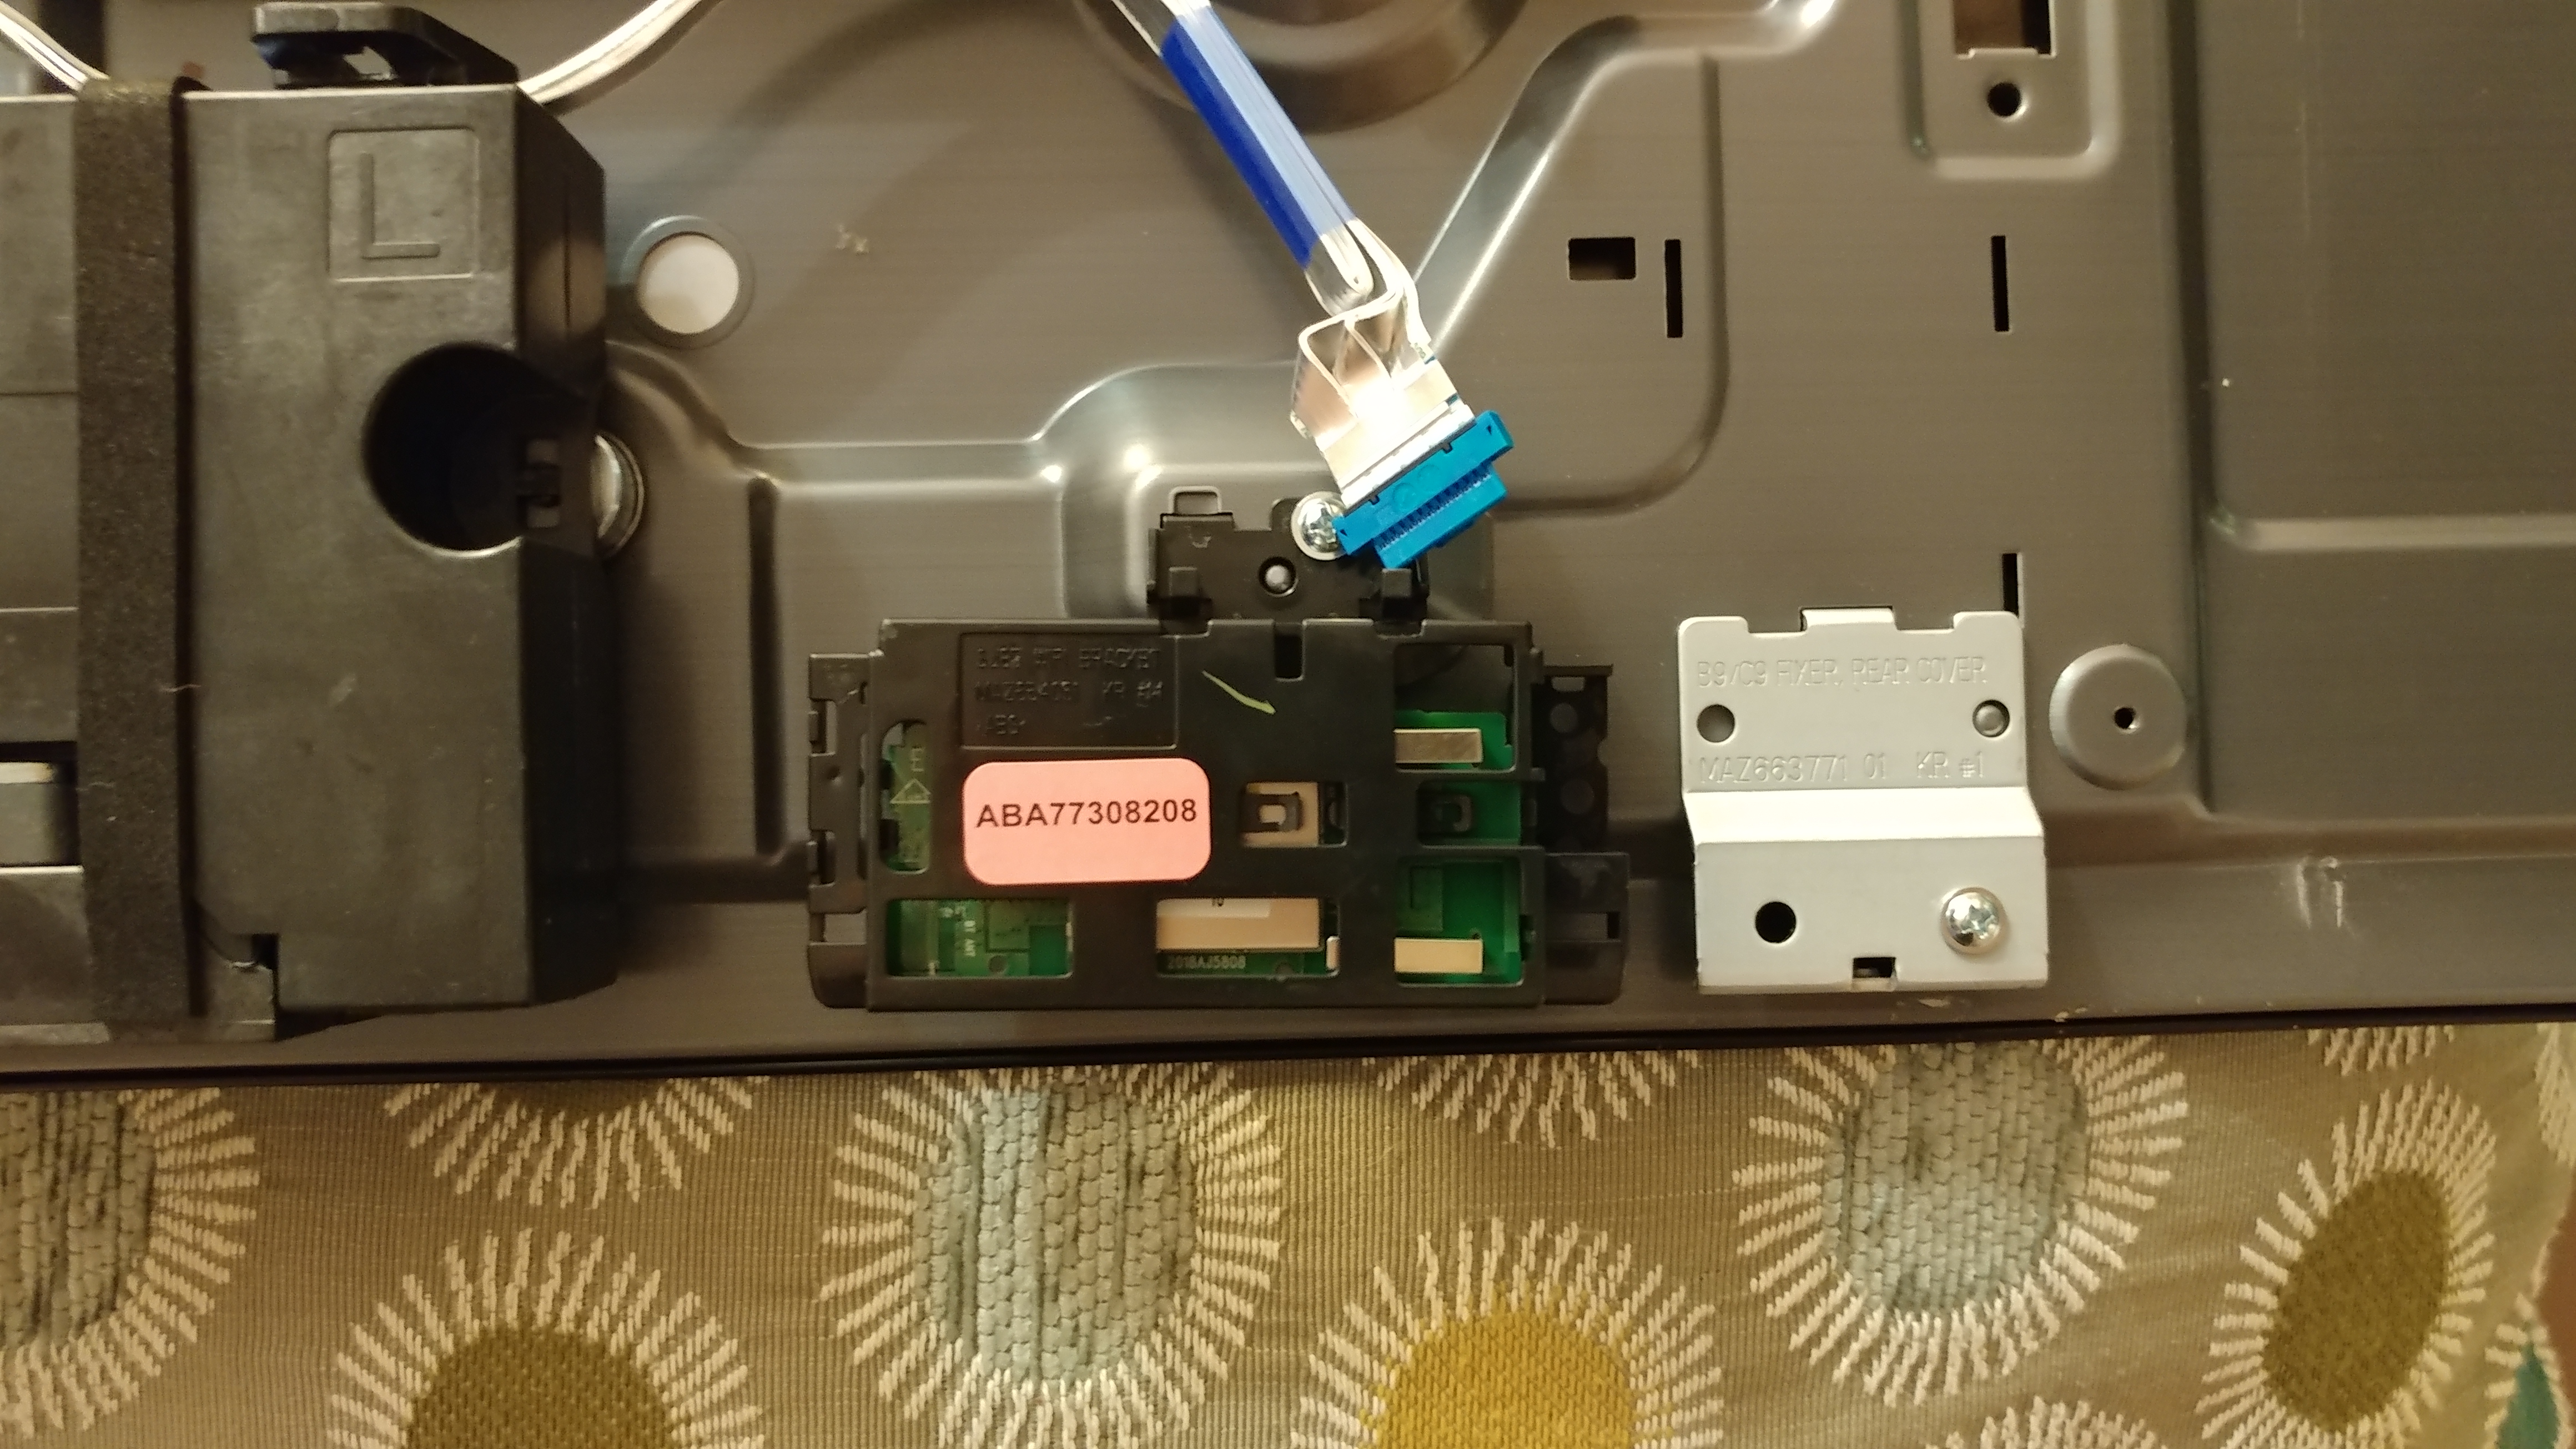
A view of the disconnected Wi-Fi module from further out.
5. Reassembly
All that was left now was to reconnect the power cord and put the shroud back on. I just reversed the process of removing it. Some light pressure on the back on the shroud popped all of the tabs and clips back into place.
I wasn’t completely sure that I hadn’t just killed my new TV, so after reconnecting the power cord, I turned the TV on just to see if it would complain about not having a Wi-Fi module any longer. It worked fine with no complaints!
Other Thoughts
All told, this ended up being much easier than anticipated, and I can now enjoy my expensive TV without worrying about whether it is spying on me. There’s no need to trust that the various on/off software toggles are honoring my choices–by removing the Wi-Fi module, the TV can’t communicate to the Internet, even by silently connecting to open Wi-Fi networks.
Of course, at some point I may want to connect my TV to the network. Maybe a future firmware update will bring new features that are actually useful, or maybe I will want to access media from my local network via a self-hosted service like Kodi or Jellyfin. In this case, I can still connect the TV via Ethernet. And since I use OpenWRT on my router, I can block the TV’s MAC address from reaching the wider Internet.
In fact, before I disconnected the Wi-Fi module, I connected the TV to an isolated VLAN via Ethernet to update the TV firmware. But I doubt I will ever really need to do that again.